Endgame Explorations 4: Zugzwang (Part 1)
Noam Elkies
It is a familiar paradox of chess that the right to move (the "tempo") can occasionally become an onerous obligation. [Just how much this obligation affects the character of the game is generally underestimated: observe for instance that even the basic endgame of king and rook against king would be drawn if the weaker side were allowed to pass at will instead of making a move.] Chessplayers know such situations as zugzwangs-- "zugzwang" being the German for "obligation to move"-- and further distinguish simple
zugzwang, a position where only one side can suffer from having the move (the other side having advantageous or at least neutral moves available), from mutual zugzwang, a position where neither side can move without worsening its position. (Some writers describe only mutual zugzwang as "zugzwang" and call a simple zugzwang a "squeeze"; I prefer the more common usage described above, which is also closer to the original meaning of the word.) We illustrate these ideas with some concrete examples, borrowed from GM Edmar Mednis' column on doubled pawns in the May-June issue of Chess Horizons.

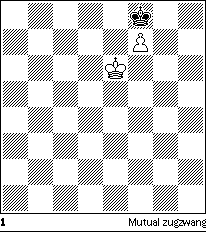
Diagram 1 shows the most fundamental mutual zugzwang in chess theory: Black to play must relinquish f8 with Kg7, letting White win by Ke7 and f8/Q; White to play can only draw, either abandoning his last pawn or stalemating with Kf6. Add a White pawn on f4 to Diagram 1 and it becomes a simple zugzwang: White wins regardless of whose move it is, since he has the neutral move f5 (or even Ke5), even though Black would still draw if he could only pass every move. With the extra White pawn on f5, though, it's a mutual zugzwang again, since White has no neutral pawn moves left (f6 is still stalemate!), and sacrificing the forward f-pawn will only get back to Diagram 1 with White to move. Quiz: where else could a piece be added to Diagram 1 to get a new mutual zugzwang? What if the White king were on g6 instead of e6?
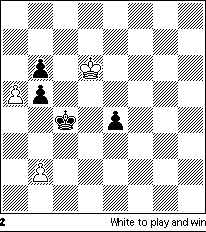
There are literally thousands of zugzwang positions, both simple and mutual, in the theory and practice of endgames with little material-- remember the "opposition"? Composed endgames naturally tend to the more exotic possibilities of the zugzwang theme, as witness the following specimen (K. A. L. Kubbel, Leningrad Pravda 1927):

There's nothing exotic about zugzwang in a pawn endgame, but this won't long remain a pawn endgame: the impending promotion of the pawns on a5 and e4 will bring about a queen endgame where if anything White seems a little worse. And yet...
1 a6!
The Black b-pawns will only help White.
1 ... e3 2 a7 e2 3 a8/Q e1/Q 4 Qd5+ Kb4 5 Qd3!
Suddenly Black is caught in zugzwang in a wide-open queen endgame! King moves permit an immediate 6 Qa3# thanks to the self-blocking Black pawns, and random queen moves abandon c3 to the mate in two with 6 Qc3 Ka4 7 Qa3#. There remain only the "corrections" 5 ... Qa1(c1), which however lose the queen to discovered attack in two pretty echo variations: 6 Qc3(a3) Ka4(c4) 7 b3+!
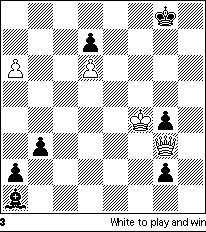
Now it happens that the Kubbel zugzwang after 5 Qd3! was actually mutual, since were White to move again he could not maintain the bind (queen and pawn clearly must stay put, and the king cannot both keep control of c5 and stay out of check: Kd7 Kc5, or Kd5 Qh1); but Kubbel's setting does not take advantage of this. Endgame composers often try to present a mutual zugzwang in the context of "losing the move": White has a choice of entering the crucial zugzwang with either side to move, and purposefully gives up a tempo to force the zugzwang on Black. This explains the queen maneuver in moves 5 and 6 of Kasparyan's first-prize endgame in Magyar Sakkelet 1959:

1 Qxg2!
White must resist taking either pawn with check; Black promotes safely
after 1 Qxg4+ Bg7 or 1 Qxb3+ Kg7 2 Qxa2 g1/Q, or here 2 a7 Be5 and 3 ... a1/Q.
1 ... Be5+
1 ... b2? loses, here and also on the next move, to 2 Qd5+ and 3 Qxa2.
2 Kf5!
Now Black will still promote, but meanwhile White encircles Black's king. Not 2 Kg5? because Black could ruin everything by interpolating Bf4 with check on his third move.
2 ... a1/Q 3 a7! Qxa7
Forced, since after 3 ... Qb1+ 4 Kxg4 the next king move would expose Kg8.
4 Kg6!
Not yet 4 Qd5+? Kh7! and White must settle for a perpetual. Now White threatens mate starting with 5 Qd5+, and also ties the Black queen to the defense of a8.
4 ... Qa1!
Not 4 ... Kf8 5 Qf1+, while if 4 ... Qa5 White mates with 5 Qh1 and 6 Qh7(+) since Black has no checks.
5 Qd5! Kh8 6 Qe4!!
Again a surprising mutual zugzwang in the queen endgame, with White down a piece and two passed pawns to boot! Any Black move permits a decisive penetration of White's queen: 6 ... Q-any 7 Qh1+, Qxe5+ or Qa8+; 6 ... B-any 7 Qe8+; 6 ... b2(g3) 7 Qxe5+(Qh4+); and finally 6 ... Kg8+ 7 Qc4 and 8 Qc8#.
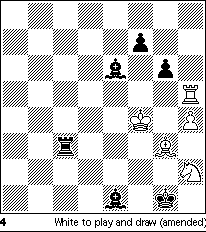
And finally an endgame composition of my own, which won first prize in the 1984 Ring Tourney of Shahmat (the Israeli chess monthly):

1 Nf3+!
Else either the Rh5 or the Bg3 fails, since if 1 Rg5? Bd2+.
1 ... Rxf3+!
If 1 ... Kf1 2 Rg5! Rc4+ 3 Ke3! Bxg3 4 Rxg3 Rc3+ 5 Kf4 Kf2! 6 Nd2! and White holds.
2 Kxf3 Bg4+!
The point of Black's play-- not 2 ... Bg3 3 Rg5 or 2 ... gxh5 3 Bxe1 and White cannot lose. Now if 3 Kxg4 gxh5+ 4 K-any Bxg3 5 Kxg3 f6! controls the g5-square and wins by zugzwang: 6 Kh3 Kf2, or 6 Kf4 Kh2. Giving up the bishop with 4 Kxh5 Bxg3 would also fail after 5 ... Be5. So White must contrive to bring about the same zugzwang position but with Black to play:
3 Kf4!! Bxg3+ 4 Kxg4 gxh5+
And now if 5 Kxg3 f6! and Black wins as before, so:
5 Kh3!!
This is White's point, refusing for the second time to take Black's bishop. Black cannot stop White from taking the bishop on his next turn, because moving or defending it with 5 ... Kf2 puts White in stalemate, and so finds himself caught in zugzwang, since after 5 ... f6 6 Kxg3 White has the opposition and holds the draw with 6 ... Kh1 7 Kh3 Kg1 8 Kg3 Kf1 9 Kf3 Ke1 10 Ke3 and so forth. There remains only:
5 ... Kf1
No better is 5 ... Bxh4 6 Kxh4 and both Black pawns fall.
6 Kxg3 Ke2 7 Kf4 f6 8 Kf5 Kf3 9 Kxf6 Kg4
Or 9 ... Kf4 10 Ke6!
10 Ke5 Kh4 11 Kf4
And White has reached a theoretical draw.
Why the "Amended" label for Diagram 4? Well, the black rook
originally stood on a3, until last year Hans Berliner's chess computer Hitech found the "cook" 1 ... Kf1! 2 Rg5 Ra4+! (not yet 2 ... Bxg3+ 3 Kxg3! Ke2 4 Re5+ and draws) 3 Ke3 Bxg3 4 Rxg3 Ra3+ 5 Kf4 Kf2! and wins (6 Nd2 Ra4+). Fortunately this was easily fixed by the otherwise inconsequential change of moving the rook to c3, which not only lets White draw in that line after 6 Nd2 (controlling c4!), but also reduces the Be1's scope and so prevents another possible cook with 1 ... Kf1 2 Rg5 Bb4(a5).
Quiz answer: Diagram 1 remains a mutual zugzwang after the addition of a White pawn on h5, a Black pawn on e7, or a White knight on g7. With the White king on g6 instead of e6, the last two zugzwangs still work, but a White pawn on d5 spoils the mutual zugzwang since White can win with 1 Kf5! (not 1 d6? stalemate) 1 ... Kxf7 2 d6! Kf8! 3 Kf6! Ke8 4 Ke6 Kd8 5 d7. The position after 4 Ke6 is, of course, again a mutual zugzwang, and indeed
illustrates a rudimentary progressive zugzwang: a position whose evaluation as a zugzwang hinges on a further zugzwang later in the analysis (here the translation of Diagram 1 arising after 4 ... Kd8 5 d7 or, with White to move, 5 d7 Kd8). Progressive zugzwang, and its more complex form as the
"corresponding squares" theme, will be explored in the next column.
Noam Elkies is now Professor of Mathematics at Harvard University and is the author of "Chess Art in the Computer Age," published in ACJ 2 (1993). This article originally appeared in Chess Horizons.Next column: Zugzwang (Part 2).
This page last modified on
28 April 2018.
Copyright (c) 1995-2018 Christopher F. Chabris. All rights
reserved.
